by Eric Hosick (erichosick@interfacevision.com)
We had a difficult choice to make. Use OS native controls for layout or roll our own. We chose to roll our own engine for different reasons. We learned a few things from this:
The results themselves aren’t impressive really. This is just an engine to layout elements using CSS and HTML.
In future posts, we will show what type of UI/UX we can create using the layout engine. After all, the purpose of this is to create a visual programming language. A very robust UI/UX system to display a program visually is really important.
We aren’t currently trying to implement all of HTML5 + CSS3 as defined within the specifications and we will probably never go for backwards compatibility. However, we have implemented a decent bit of HTML5 + CSS3.
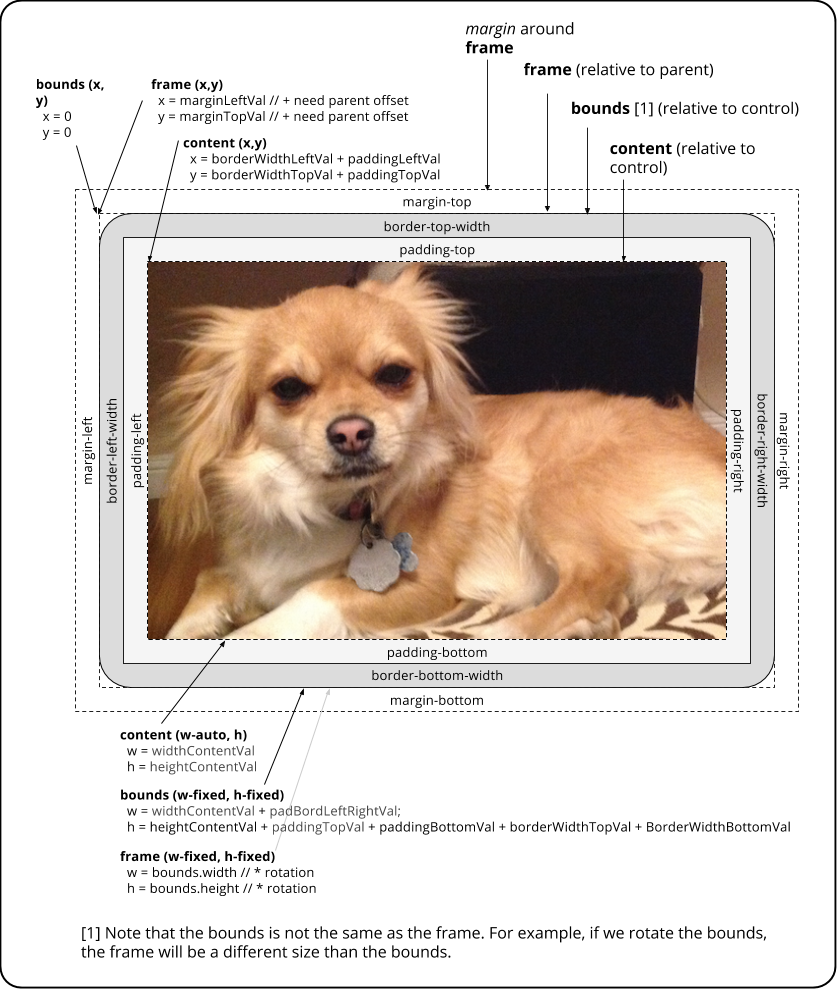
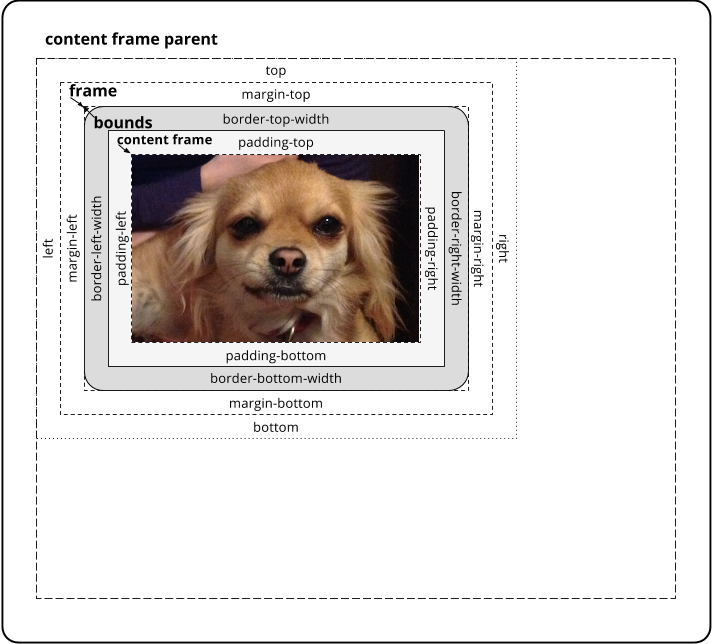
We drew our ‘requirements’ from w3schools. We iteratively built out functionality starting out with a single div and ending up with support of margin, borders, padding, top, bottom, left, right, auto, etc.
Using these these requirements, we sketched out what a UxControl consists of along with some Pseudo code to get our heads around all of the stuff that needs to happen in a layout engine.
We can’t emphasize enough how much behavior driven development and test driven development helped us with building the layout engine. The engine itself is currently around 850 lines of code with tests running around 6,000 lines of code. It takes around a quarter of a second to run all the tests natively. We have not optimized the layout engine in any way yet but will when needed.
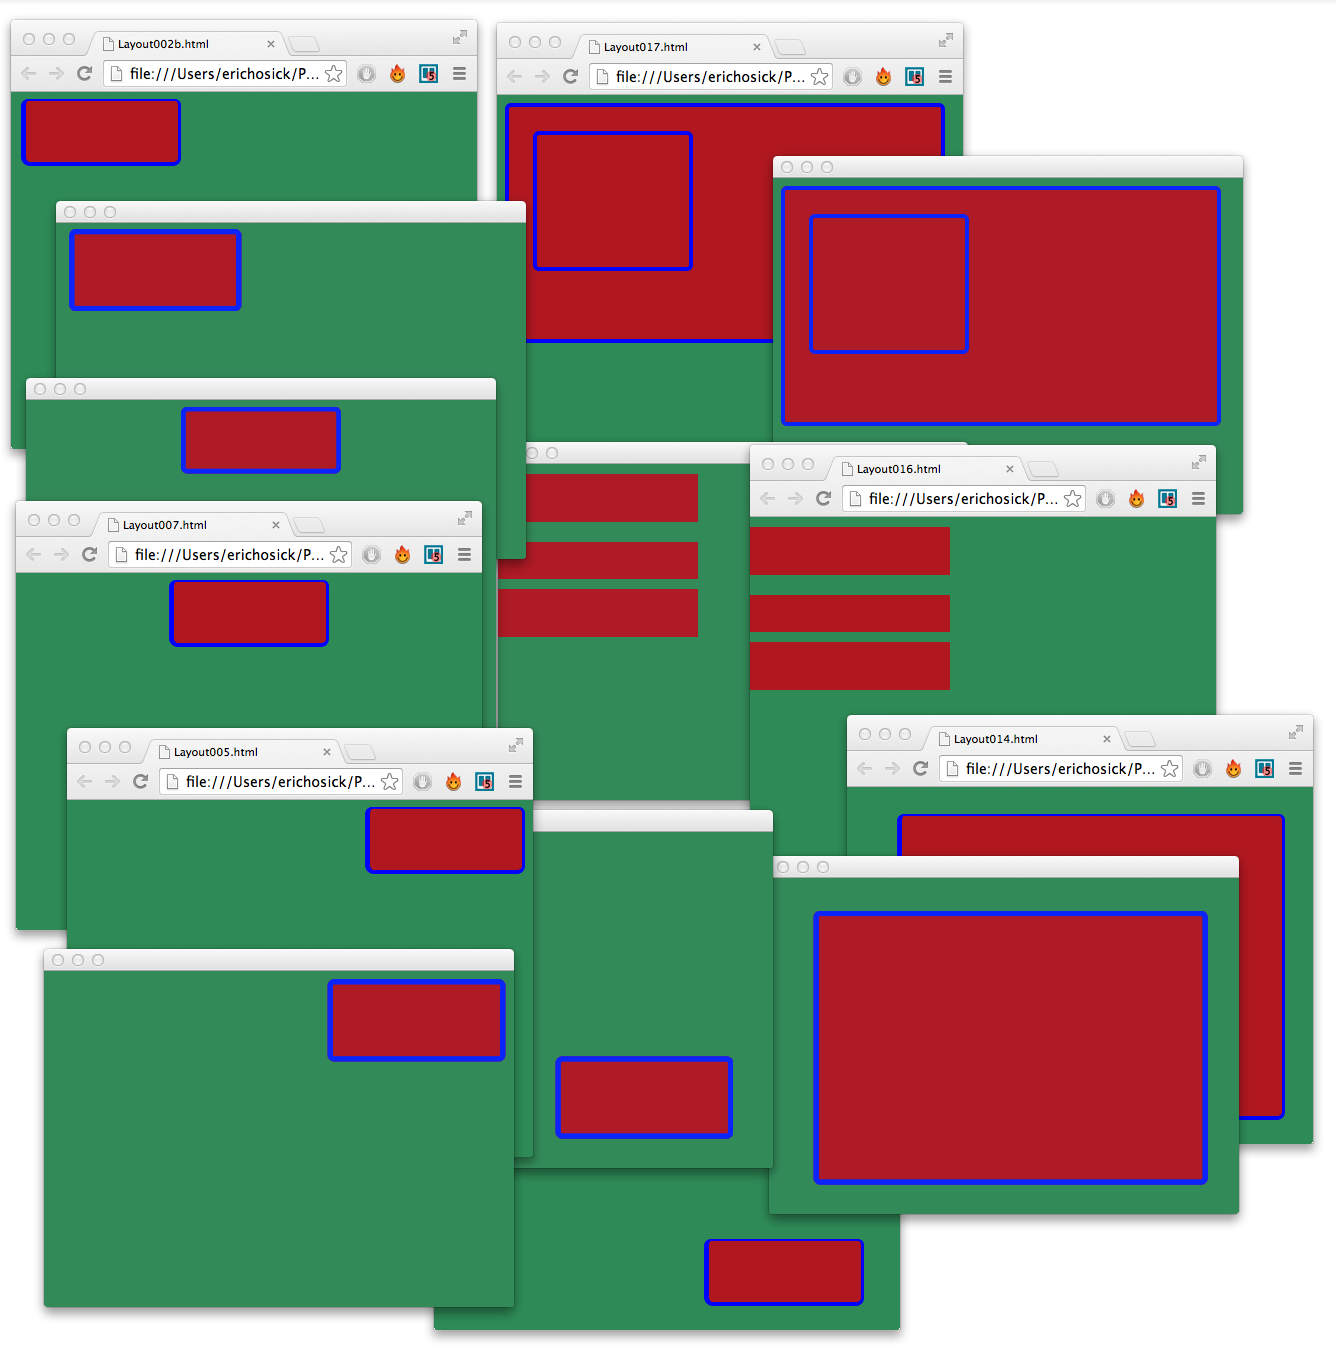
We also did visual inspection of the results of the layout engine with Google Chrome (some day we will automate this).
Some of the output of the automated tests are shown below.
In a nutshell, BDD basically starts with a given state like “If the window is 768 pixels by 1024 pixels and we have the following ux configuration then all of these things should be true.”
For a given ux part we need to verify calculations like:
To validate these hundreds of calculations, we will setup a simple configuration. The configuration can run within a Scope expecting an array of properties to test, the expected value and the actual value. We also provide some context info so we can print a nicely formatted message if the values don’t match up.
PartNamedString ( keyStr = "testPart"
  ForEach (
    part PropScopeGet ( nameStr "propToTest" )
    action WhenNot (
      condition IsNearlyEqFloat (
        left PartIndexStringGet ( nameStr "valExp"
          part PropScopeGet ( nameStr "current" ) )
        right PropGet (
          name PartIndexStringGet ( nameStr "propName"
            part PropScopeGet ( nameStr "current" ) )
          part PropScopeGet ( nameStr "uxControl" ) ) )
      action ConsoleWriteLine (
        text TextFormatter (
          text Vision.Core.String (
            withStr "@testName@: The @propName@ of @uxControlName@ should be @valExp@ but was @actualValue@." )
          parameters ArrayList (
            insert PartNamedString ( keyStr "@testName@"
              part PropScopeGet ( nameStr "testName" ) )
            insert PartNamedString ( keyStr "@propName@"
              part PartIndexStringGet ( nameStr "propName"
                part PropScopeGet ( nameStr "current" ) ) )
            insert PartNamedString ( keyStr "@uxControlName@"
              part PropScopeGet ( nameStr "controlName" ) )
            insert PartNamedString ( keyStr "@valExp@"
              part PartIndexStringGet ( nameStr "valExp"
                part PropScopeGet ( nameStr "current" ) ) )
            insert PartNamedString ( keyStr "@actualValue@"
              part PropGet (
                name PartIndexStringGet ( nameStr "propName"
                  part PropScopeGet ( nameStr "current" ) )
                part PropScopeGet ( nameStr "uxControl" ) ) ) ) ) ) ) )
Let’s see how we use this configuration.
Scope (
  properties HashTable (
    insert PartNamedString ( keyStr "uxControl"
      part PropScopeGet ( nameStr "winNative" ) )
    insert StrKeyStr ( keyStr "controlName" withStr "winNative" )
    insert StrKeyStr ( keyStr "testName" withStr "Test001" )
    insert PartNamedString ( keyStr "propToTest"
      part ArrayList (
        insert HashTable (
          insert StrKeyStr ( keyStr "propName" withStr "marginTop" )
          insert FloatKeyStr ( keyStr "valExp" withFloat 0.0f ) )
        insert HashTable (
          insert StrKeyStr ( keyStr "propName" withStr "marginRight" )
          insert FloatKeyStr ( keyStr "valExp" withFloat 0.0f ) )
        insert HashTable (
          insert StrKeyStr ( keyStr "propName" withStr "marginBottom" )
          insert FloatKeyStr ( keyStr "valExp" withFloat 0.0f ) )
        insert HashTable (
          insert StrKeyStr ( keyStr "propName" withStr "marginLeft" )
          insert FloatKeyStr ( keyStr "valExp" withFloat 0.0f ) ) ) ) )
  part PropScopeGet ( nameStr "testPart" required false ) )
Our above scope has 4 properties named uxControl, controlName, testName and propToTest. Each of these is a different type:
The “testPart” configuration is declared somewhere above our test configuration. When this scope runs, it runs whatever is located in the part property which is the “testPart” configuration:
part PropScopeGet ( nameStr "testPart" required false ) )
The testPart configuration starts with a ForEach part. This part is defined as follows:
ForEach (
  part ( ... ) // The list of items
  action ( ... ) // The action to run against each part.
)
In our testPart configuration, for part we have the following configuration:
part ( PropScopeGet ( nameStr "propToTest" ) )
This is really cool, because if we look for the scope property named “propToTest” we will see it is the ArrayList of HashTables of each property to test and their values. Ok, so we run through each item of this array. Where do we read the current item from in the ForEach loop?
The for each loop places it’s current item in a scope property named “current”. This is why you see the following scattered throughout the configuration:
PropScopeGet ( nameStr "current" )
For the action on each item within the “propToTest” array we check if the value within the actual property is equal to the expected value. The IsNearlyEqFloat part
IsNearlyEqFloat (
  left ( ... ) // Item on the left of the comparison.
  right ( ... ) // Item on the right of the comparison.
)
Since each current part is a HashTable, we want to get one of the elements from the hashtable. We can do this using the PartIndexStringGet Part:
PartIndexStringGet (
  nameStr "..." // The hash code/index
  part ( ... ) // The hash table, array and/or collection
)
In the above configuration, we have the left property of IsNearlyEqFloat configured as follows:
left PartIndexStringGet ( nameStr "valExp"
  part PropScopeGet ( nameStr "current" ) )
Isn’t that cool? We are saying that we want the part named “valExp” located in the “current” property which happens to be one of our hash code definitions like:
insert HashTable (
  insert StrKeyStr ( keyStr "propName" withStr "marginTop" )
  insert FloatKeyStr ( keyStr "valExp" withFloat 0.0f ) )
The right configuration is a little more complex. We are using the PropGet part which gives us access to the property of a part instance (using reflection).
PropGet (
  name ( ... ) // A configuration that returns the name of the property
  part ( ... ) // The instance that contains the property.
)
This is also cool, because the name we want is in our hash table with the hash code “propName”. So, let’s configure the name property as follows:
name PartIndexStringGet ( nameStr "propName"
  part PropScopeGet ( nameStr "current" ) )
This is also kinda cool! We are getting the item at index “propName” within the hash table located in the “current” scope property.
When name is accessed by PropGet, withStr of that part is accessed. As we see above, withStr is set to “marginTop”
So, in this case, the name of the property being used by PropGet is “marginTop”! The actual part is really easy to access and is configured as follows:
part PropScopeGet ( nameStr "uxControl" ) ) )
When the expected value does not equal the actual value, we write something to the console using the ConsoleWriteLine part. It is configured with a very interesting part called a TextFormatter part. This part is easy to configure.
TextFormatter (
  textStr ( ... ) // the text we need to format.
  parameters ( ... ) // Configured with an array of "named" properties used to format text.
)
One of our parameters is configured as follows:
insert PartNamedString ( keyStr "@testName@"
  part PropScopeGet ( nameStr "testName" ) )
This configuration, when called, would return the name of the test, which could be something like “Test001”.
The textStr in this configuration is defined as follows:
"@testName@: The @propName@ of @uxControlName@ should be @valExp@ but was @actualValue@."
Basically, the TextFormatter goes through each item in the array, gets the value of the item, matches the string in the text with the keyStr of the item and replaces it. In this case, the part named “@testName@” returns a vale of “Test001”. All matched text is then replaced with “Test001” as follows:
"Test001: The @propName@ of @uxControlName@ should be @valExp@ but was @actualValue@."
and so on.
Of course, you could use any format you like for keyStr. We could have just as easily done something like:
"<<testName>>: The <<propName>> of <<uxControlName>> should be <<valExp>> but was <<actualValue>>."
and defined our parameters as:
insert PartNamedString ( keyStr "<<testName>>"
  part PropScopeGet ( nameStr "testName" ) )
The really cool part is that we can place any configuration we like within our PartNamedString part property: even another TextFormatter. This is kinda cool because we can end up generating very complex text using such a simple part.
This blog was supposed to be about creating a view that can easily display collections (aggregates). It turns out we don’t need to define such a view within our framework and can, instead, use our layout engine in conjunction with composition to display collections and aggregates.
We now have a layout engine that can do just that: display lists of items. We’ve built up a new set of tests to go against a better css layout engine.
We can now start displaying a configurations visually!
The next step is to display our current configuration of Interface Vision visually! This will be a big milestone for us.
The prior step in our goal of creating Interface Vision’s Gui based visual development environment was to dynamically add controls by using factories (instead of ‘hard coding’ our configuration).